It's normal to struggle at first but it gets better!
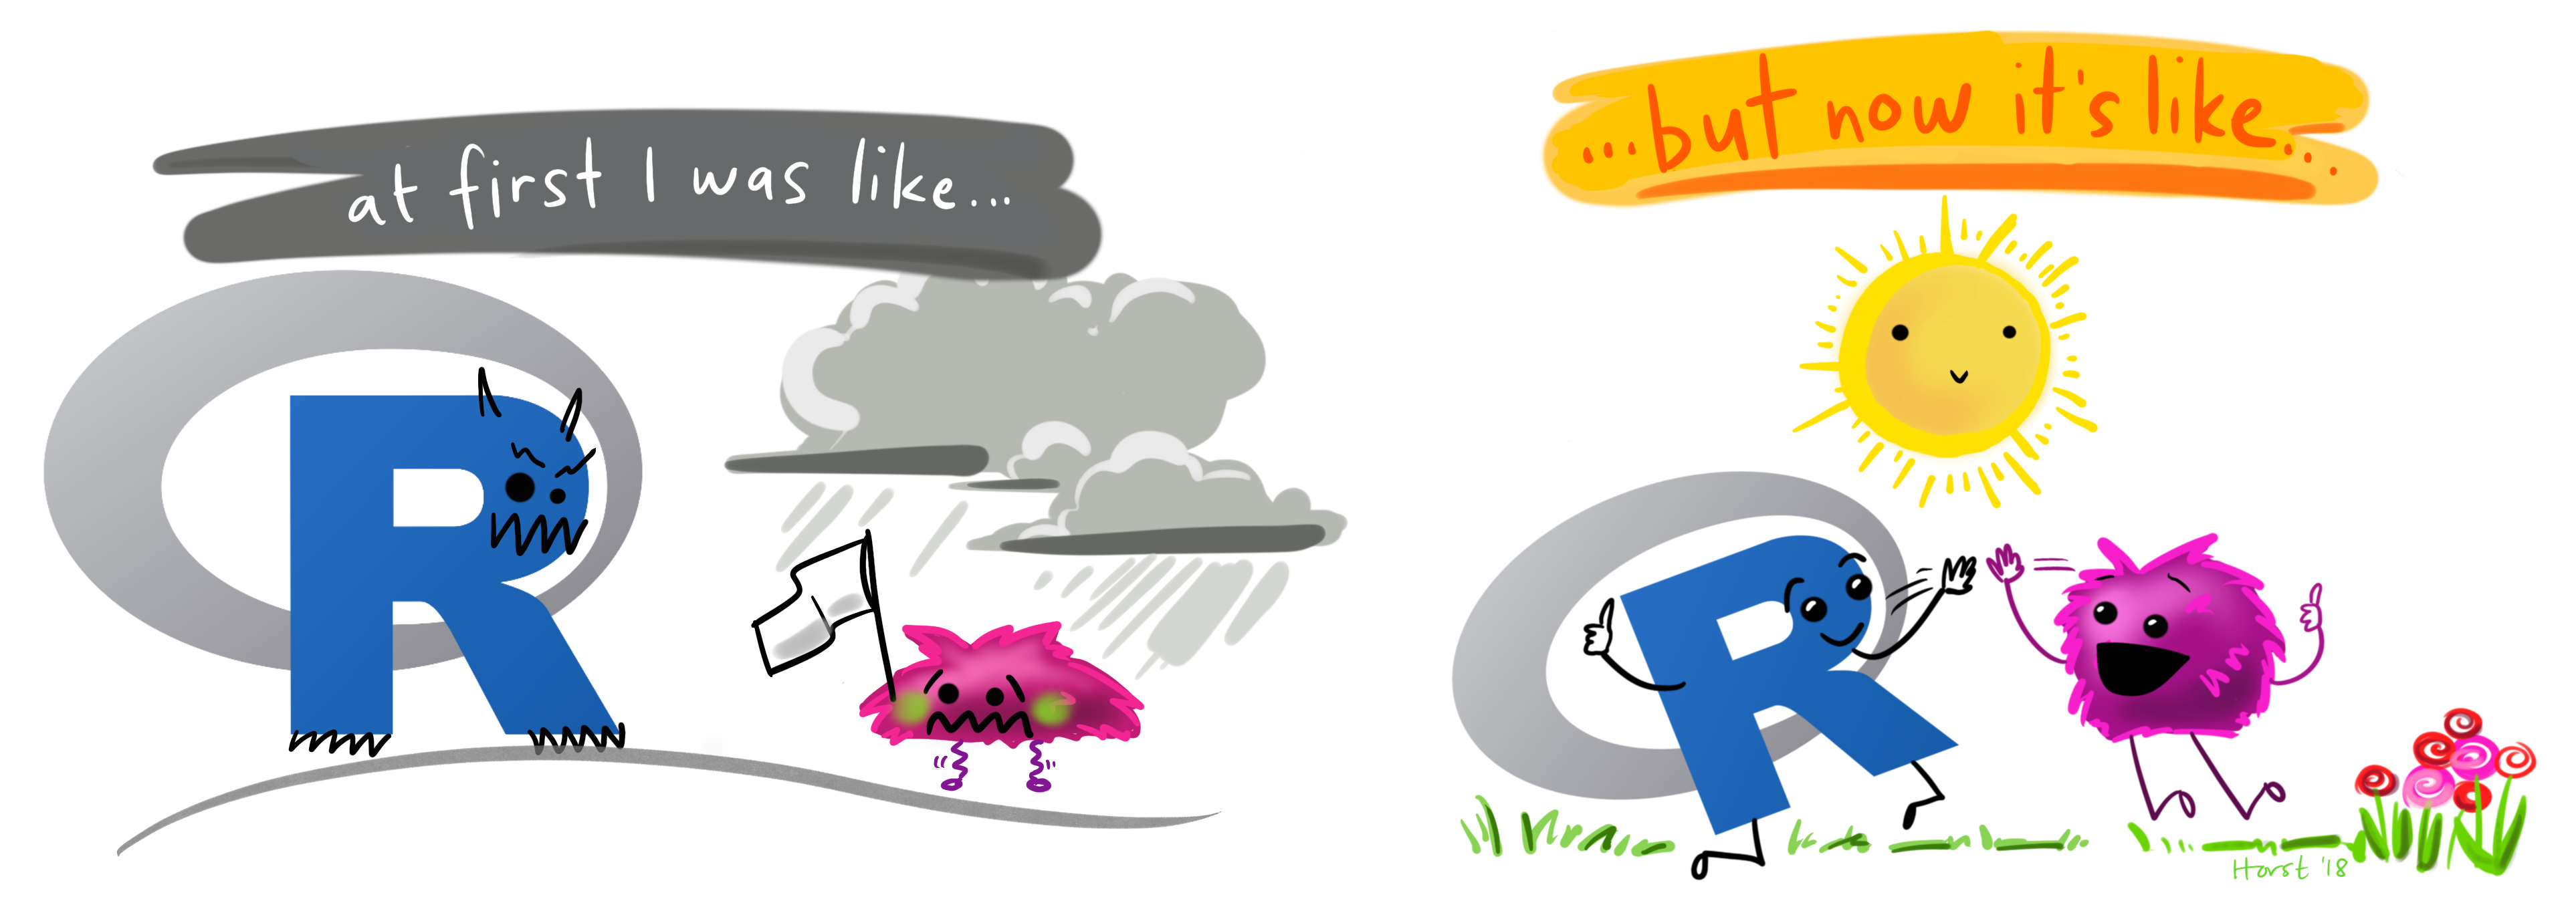
Illustration adapted from Allison Horst
- My experience is that this stuff isn't super easy... but it gets better!
It's normal to struggle at first but it gets better!
Illustration adapted from Allison Horst
My experience is that this stuff isn't super easy... but it gets better!
Mostly because of:
- Awesome inclusive community that is always ready to help
- Great documentation of existing packages and functions
- Active blogosphere with use cases and examples
- and much more!
Why Even Create an R Package
R packages are a wonderful way to make functions and datasets easily accessible for everyone
R really comes alive because of the many awesome packages that hundreds and hundreds of volunteers help create and maintain
It's a great way to become active in the R community & give back

Before we Start..
Make sure you installed the latest R and Rstudio version
Install the following packages:
pkgs <- c("devtools", "roxygen2", "usethis", "testthat")install.packages(pkgs)And now?
Choosing a package name

Choosing a Package Name
The available package will help check whether your desired package name is still.. well.. available:
library(available)available("datenguideR", browse = F)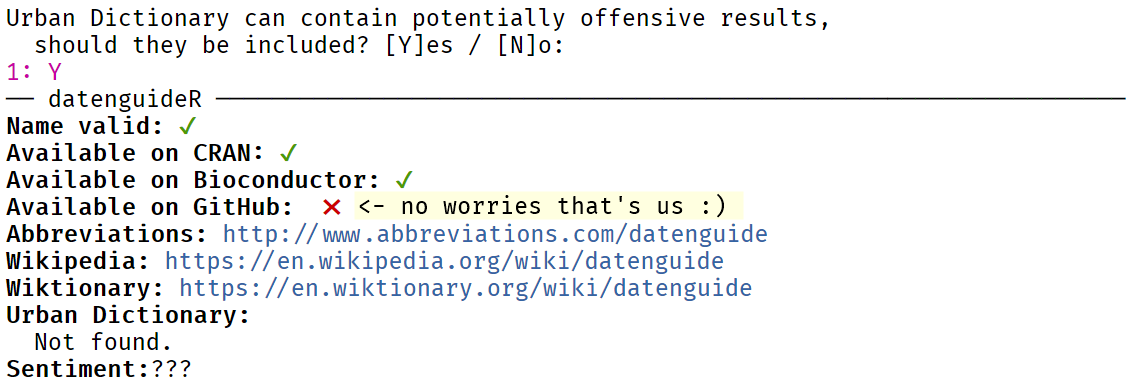
tfw your chosen package name is still available

usethis
The purpose of usethis is to
… automate repetitive tasks that arise during project setup and development, both for R packages and non-package projects.
usethis
The purpose of usethis is to
… automate repetitive tasks that arise during project setup and development, both for R packages and non-package projects.
As you can guess by the description usethis is VERY useful for package creation and we will be using its functions quite often during development.
We're going to focus on two types of functions within usethis
(although there are MANY more)
use_*- for example
use_pipeto include the pipe operator in your package
- for example
create_*- for example
create_from_githubwhich creates a local Git repository from GitHub
- for example
Creating your first R Package
The following code will create a minimal R package:
library(usethis)create_package("~/git_projects/datenguideR")All you need to do is specify a path. If it exists, it is used. If it does not exist, it is created, provided that the parent path exists.
Creating your first R Package
The following code will create a minimal R package:
library(usethis)create_package("~/git_projects/datenguideR")All you need to do is specify a path. If it exists, it is used. If it does not exist, it is created, provided that the parent path exists.
But because being tidy is awesome we will be using create_tidy_package
create_tidy_package("~/git_projects/datenguideR")This function will also create a new package but it will also apply many great tidyverse conventions that will come in handy.
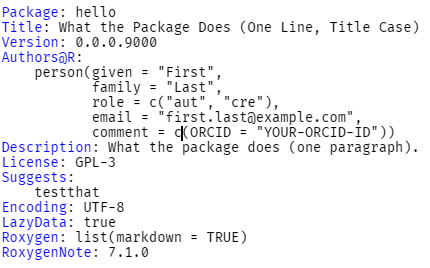
Creating your first R Package
-- R-- tests-- DESCRIPTION-- NAMESPACE-- cran-comments.md-- LICENSE.md-- README.Rmd-- README.mdThis is a file that contains meta-info about your package including authors, description and license. It's also the place for adding package dependencies.
Congratulations you created your very first R package!


Let's start adding functions to our package!
Let's start adding functions to our package!
By first of all talking about how to name our functions
It's time to type some R code
Documentation
Documentation is absolutely central.
It's basically the guidance for your users so they know how to use the functions within your package.
Documentation
Documentation is absolutely central.
It's basically the guidance for your users so they know how to use the functions within your package.
Or as Hadley Wickham puts it:
Documentation is one of the most important aspects of good code. Without it, users won’t know how to use your package, and are unlikely to do so.
There is a built-in functionality within R to document packages: .Rd files that are stored in the man subdirectory of your package. These files use a syntax that is similar to Latex.
Here to help us with documentation is roxygen2 which conveniently creates a lot of the necessary files with its own more intuitive syntax style.
Documentation
This is how documentation for our add function might look like:
#' Add together two numbers.#'#' @param x A number.#' @param y A number.#' @return The sum of \code{x} and \code{y}.#' @export#' @examples#' add(1, 1)#' add(10, 1)add <- function(x, y) { x + y}Documentation
This is how documentation for our add function might look like:
#' Add together two numbers.#'#' @param x A number.#' @param y A number.#' @return The sum of \code{x} and \code{y}.#' @export#' @examples#' add(1, 1)#' add(10, 1)add <- function(x, y) { x + y}Oi. This looks.. different. So what is actually going on here?
Let's take a look at what this piece of roxygen code will generate.
Documentation
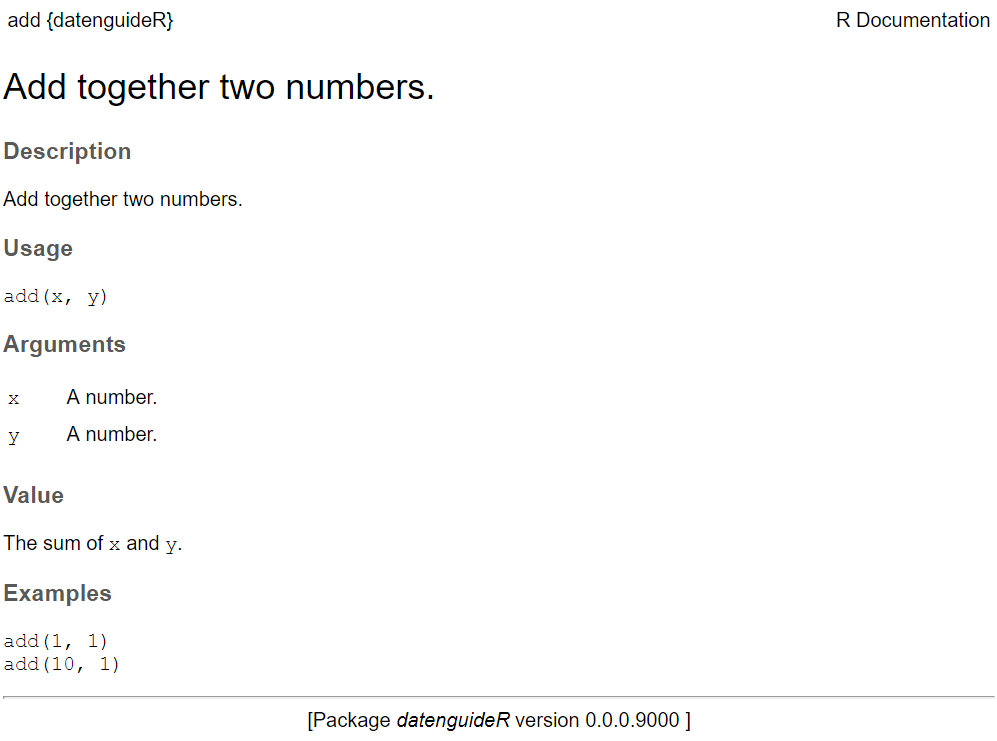
Ah. This looks more familiar!
Let's go through the original roxygen code line by line to understand it better.
Documentation
The first line of code highlighted here shows the title.
#' Add together two numbers.#'#' @param x A number.#' @param y A number.#' @return The sum of \code{x} and \code{y}.#' @export#' @examples#' add(1, 1)#' add(10, 1)add <- function(x, y) { x + y}This is a (very) short description of your function.
Documentation
You might have noticed this odd code in front of the documentation: #'
#' Add together two numbers.#'#' @param x A number.#' @param y A number.#' @return The sum of \code{x} and \code{y}.#' @export#' @examples#' add(1, 1)#' add(10, 1)add <- function(x, y) { x + y}Roxygen comments start with this symbol in order to distinguish them from your usual comments (#)
Documentation
Next up is the @param name descriptions for our functions.
#' Add together two numbers.#'#' @param x A number.#' @param y A number.#' @return The sum of \code{x} and \code{y}.#' @export#' @examples#' add(1, 1)#' add(10, 1)add <- function(x, y) { x + y}These lines of code describe the function’s inputs or parameters. The description usually documents what the parameter does, what the default inputs are (if any) and what the object type should ideally be (e.g., string, numeric vector etc.).
Documentation
We continue with the @return name description.
#' Add together two numbers.#'#' @param x A number.#' @param y A number.#' @return The sum of \code{x} and \code{y}.#' @export#' @examples#' add(1, 1)#' add(10, 1)add <- function(x, y) { x + y}The @return tag simply describes the output from the function.
By using \code{} we can also make sure that the variables x and y are written in code font.
Documentation
We continue with the @return name description.
#' Add together two numbers.#'#' @param x A number.#' @param y A number.#' @return The sum of `x` and `y`.#' @export#' @examples#' add(1, 1)#' add(10, 1)add <- function(x, y) { x + y}The @return tag simply describes the output from the function.
However, since we used create_tidy_package we also automatically turned on markdown style syntax within our roxygen descriptions so this style of syntax is not actually necessary here.
Documentation
Next up is the @export tag.
#' Add together two numbers.#'#' @param x A number.#' @param y A number.#' @return The sum of `x` and `y`.#' @export#' @examples#' add(1, 1)#' add(10, 1)add <- function(x, y) { x + y}This one is pretty straightforward. If you want your functions to be available to the user (and not just create an internal function to be used within the package) then it is crucial to add the @export tag.
Documentation
Finally, the @examples tag.
#' Add together two numbers.#'#' @param x A number.#' @param y A number.#' @return The sum of `x` and `y`.#' @export#' @examples#' add(1, 1)#' add(10, 1)add <- function(x, y) { x + y}Adding examples to functions can really help your users figure out how your package is meant to be used.
Documentation

With this, the roxygen code for your documentation is done. The last thing to do is converting your description to .Rd files so it can appear in the help file.
Luckily, with the help of the devtools package this step is really easy to do.
Just type in the following code:
library(devtools)document()Updating datenguideR documentationWriting NAMESPACELoading datenguideRWriting NAMESPACEWriting add.RdIf you now type ?add into R it should render the development description that we saw earlier.
That's it!
We created our very first function documentation!

Unit Testing

<⌒/ヽ-、_ /<_/____/ 'I cant sleep if you dont test your functions' ∧_∧ ( ・ω・) _| ⊃/(___ / └-(____/  ̄ ̄ ̄ ̄ ̄ ̄ ̄Testing is really important to make sure your package is functioning as intended.
Unit Testing
<⌒/ヽ-、_ /<_/____/ 'I cant sleep if you dont test your functions' ∧_∧ ( ・ω・) _| ⊃/(___ / └-(____/  ̄ ̄ ̄ ̄ ̄ ̄ ̄Testing is really important to make sure your package is functioning as intended.
As you keep developing and adding to your package code, keeping track of what might go wrong will become more and more complex.
Unit tests will help you with identifying issues within your code so you can pinpoint what went wrong and where.
Unit Testing
The basic setup of an unit testing is quite simple:
You write up example code with your package functions and define specific outputs that you expect.
- If they are met, great, the test is passed!
- If not, the test fails and you will know that something is wrong with your code and what failed.
To set up unit tests for your package with testthat you can simply run use_testthat (from our beloved usethis package):
use_testthat()Unit Testing
The basic setup of an unit testing is quite simple:
You write up example code with your package functions and define specific outputs that you expect.
- If they are met, great, the test is passed!
- If not, the test fails and you will know that something is wrong with your code and what failed.
To set up unit tests for your package with testthat you can simply run use_testthat (from our beloved usethis package):
use_testthat()This will create a folder tests and a subfolder testthat. This is the folder where your tests will live.
Since we created our package with create_tidy_package we don't need to run this part as this function automatically sets up testthat.
Unit Testing
How do set up individual tests?
usethis got us covered again!
Simply run this code:
use_test("hello")Unit Testing
How do set up individual tests?
usethis got us covered again!
Simply run this code:
use_test("hello")This will create the following file:
tests/testthat/test-hello.RUnit Testing
How do set up individual tests?
usethis got us covered again!
Simply run this code:
use_test("hello")This will create the following file:
tests/testthat/test-hello.RWith this content:
test_that("multiplication works", { expect_equal(2 * 2, 4)})Unit Testing
Let's take this short code apart:
test_that("multiplication works", { expect_equal(2 * 2, 4)})In the first line of code we can see the function test_that which is our main tool for unit tests.
Unit Testing
Let's take this short code apart:
test_that("multiplication works", { expect_equal(2 * 2, 4)})In the first line of code we can see the function test_that which is our main tool for unit tests.
The first argument of test_that describes what is supposed to be tested whereas the second argument encapsulates the code to be tested within a curly bracket {} environment.
Within this environment we write up our expectations with the help of testthat's expect_* functions, of which there are many.
In this case we use expect_equal which is quite straightforward. The 1st argument should be equal to the 2nd argument and if it's not, the test fails.
You ready?

Good. Because we are now designing our own test for the add function.
Unit Testing
Alright. So let's start testing our add function.
First, we will test whether addition works as intended:
test_that("addition works as intended", { result <- add(5, 5) expect_equal(result, 10)})The test did not throw an error so this worked. Perfect!
Unit Testing
How about testing that supplying a string should throw an error?
test_that("supplying string should throw error", { expect_error( add(5, "i_am_not_a_number") )})Again, this ran without problems. So everything went as we expected!
Unit Testing
Now, let's try to break our tests!

Unit Testing
Let's try to test whether 5 + 5 is more than 15:
test_that("result is more than 15", { result <- add(5, 5) expect_more_than(result, 15)})Unit Testing
Let's try to test whether 5 + 5 is more than 15:
test_that("result is more than 15", { result <- add(5, 5) expect_more_than(result, 15)})Error: Test failed: 'result is more than 15' * `result` is not strictly more than 15. Difference: -5Success! We failed! Since 5 + 5 is not more than 15 (it's actually 5 less) the test fails and we receive an informative error message as well.
Unit Testing
It takes a little bit of creativity to foresee the many ways functions within your package might break.
In practice, writing the right kind of unit tests is considered sort of an art by some and a nuisance by others.
In any case though it is really important for writing robust code that can be relied upon.
Unit Testing
Now, we have succesfully written up three tests for our add function.
The devtools package will help us test all of our unit tests at once by running the following code within your package project:
test()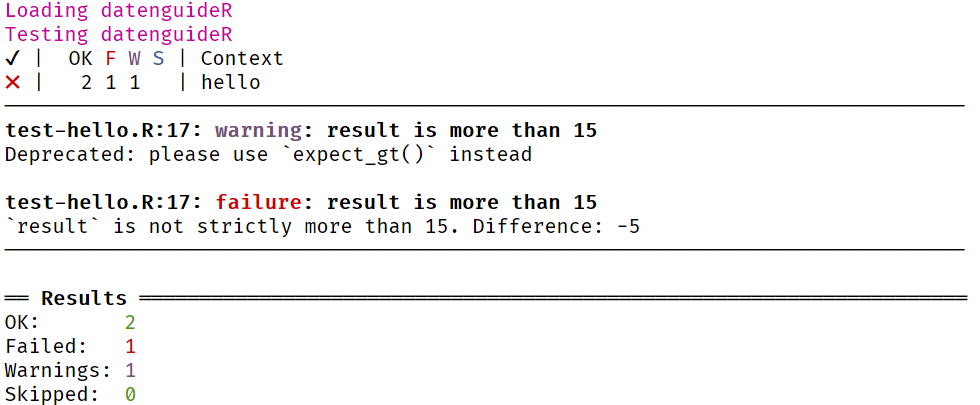
Bringing it all together
We can also run check from devtools to test pretty much everything about our package:
check()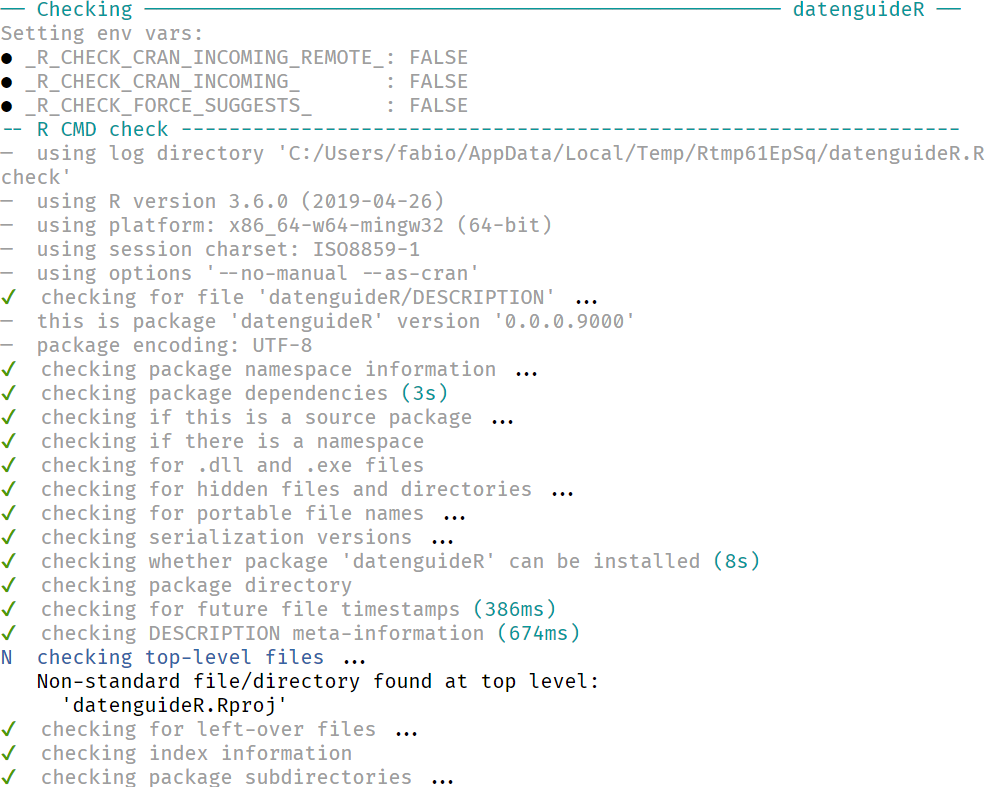
And when your package passes all checks you get the sweet feeling of getting the following feedback:
Thank you for listening